GXR情報
English ver【GXR MOUNT UNIT 1st Hands on】
Introduction
Long-awaited Match for Classic Rangefinder Lenses
by Kyo-chan
japanese ver 日本語版はこちら
GXR MOUNT "o"day review(more photos)
GXR MOUNT UNIT 2nd Shot(more lenses)
Translated by Silver, TRK and Furachan
*TRK reported GXR special reviews
review1(A12-50macro) Jpn only
review2(A12-28) Eng1,Eng2(Jpn1,Jpn2)
The development of the M-Mount compatible GXR unit was announced early and the exterior design had long been public, but specific details were not available.
It is not hard to imagine how eagerly photo-enthusiasts awaited to hear the full story.
Even we, in-house "testers", were not informed of the details until the prototypes were handed to us very recently.
There might be as many wish lists on GXR MOUNT as the number of photo-enthusiasts.
My wish now is to relate our findings on using this new fascinating unit: what functions are devised to solve our concerns, and what benefits are provided to enhance the joy of photo-shooting.
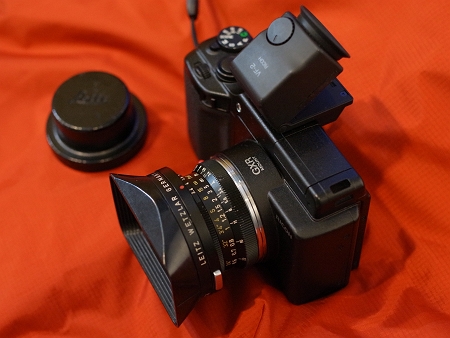
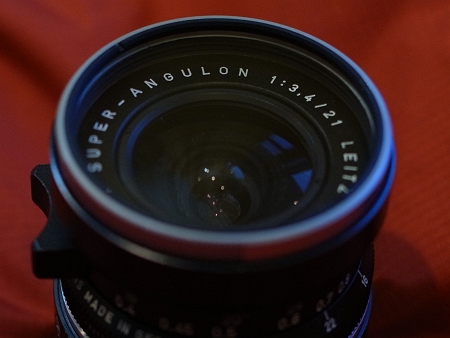
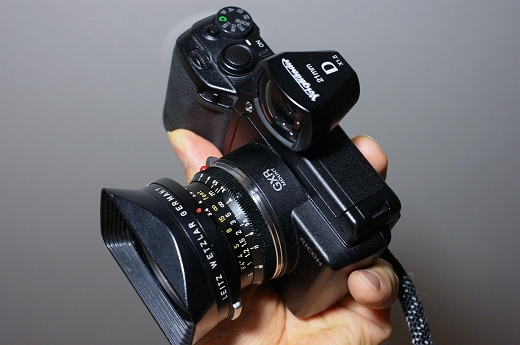
With SUPER-ANGULON 21mm
The serial number 229**** indicates this classic lens was made in 1968.
*Note: we tried to replace all the screen shots with English version; however, please forgive that we have to leave some with original Japanese display. I would appreciate your generosities.
Rangefinder Lenses - An Enormous Challenge for Digital Imaging
Essentially, the GXR MOUNT Unit is for using rangefinder (RF) lenses.
RF lenses, as typified by Ernest Leitz masterpieces, are highly reputed for their superb image quality and compact design (especially for normal and wide-angle lenses). This is attributable to the lens-design flexibility: thanks to the mirror-less structure, the restriction of back focal length is minimal. This characteristic, on the other hand, presents us with an enormous challenge.
The distance between the lens rear-element and film plane (image sensor in the case of digital cameras) tends to be very short compared to single lens reflex (SLR) cameras. This short distance results in slant incident light, which is a problem for digital imaging.
This tendency becomes more prominent as the angle of view gets wider. For the most current digital cameras, image deterioration in peripheral areas (especially corners) is structurally unavoidable.
Basically, slant incident light is not digital friendly.
(Compared with film cameras, more light fall-off and color shading at corners are likely to occur.)
To illustrate this characteristic, let me show you a film RF lens (wide-angle 21mm.)
I aligned the lens and body at the mounting level.
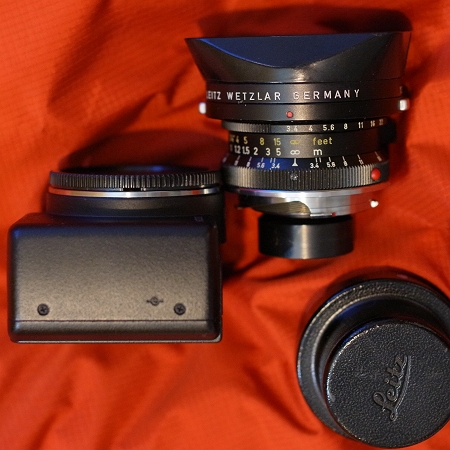
Exemplifying the virtue of RF lenses, even for this super wide-angle, the structure above the mount is amazingly small; the rear-element, on the other hand, protrudes conspicuously. The clearance between the rear-element and the image sensor (marked with the "Saturn" symbol) is really short, and it is easy to imagine how acute the angle of the incident light to the corners of the sensor is.
After the prevalence of digital SLRs, lens design method changed to favor telecentricity (all the light rays from rear-element come to the sensor as square as possible). This characteristic (applied to the A12-50mm Macro and A12-28mm unit, too) is quite well suited to digital imaging.
The GXR MOUNT unit risked facing the difficulty of low telecentricity since the prime aim of this unit is to fit RF lenses.
Another challenge is the versatility of film lenses. Since the GXR MOUNT is a universal lens-interchangable unit, we cannot specify a target lens for "optimization". This condition is completely different from other GXR Camera units; ample latitude to accept as many kinds of lenses as possible is a prerequisite of the GXR MOUNT unit.
In addition to RF lenses, almost all SLR lenses can be attached with mount-adapters. This further expands the lens universe the GXR MOUNT must cover.
Our design staff worked out several solutions leveraging accumulated knowledge through previous A12-series Camera Unit developments. There is the optimization concept applicable to the GXR MOUNT unit, too. The designers concentrated on developing the optimum unit in line with the characteristics of RF lenses.
The hardest challenge is the slant incident light at corners peculiar to film RF lenses. As a result of optimization, the GXR MOUNT unit has a superb latitude to fit a wide variety of lenses including high-speed SLR lenses.
Physically accommodating as many lenses with protruding rear elements as possible is yet another challenge, since the optical filters and focal-plane shutter above the image sensor (or the "Saturn" symbol) further narrow the already-crowded rear area.
Their endeavors are not limited to optical-electrical technology, but covered whole elements and processes of photo-shooting, such as focusing, exposure control, image setting, by-lens parameter presetting, and shooting-info tagging with an excellent user interface.
Our Planning and Design staff have devised a three-step solution.
The First Step: RF Lens-Oriented Imaging Unit Structure
From the early development stage, consideration was made in imaging device selection to let the users enjoy as many lenses as possible.
Specifically,
1) Eliminate the Optical Low-Pass Filter (LPF)
Eliminating the LPF (or anti-aliasing filter) keeps image deterioration at the corners minimal, as well as seizing the pure character of lenses without hindrance. This, combined with an ultra-thin IR cut-off filter, also contributes to the ample physical latitude to accept as many lenses with protruding rear elements as possible.
2) Adopt Optimum Imaging Device
The image sensor has a micro-lens array optimized for slant incident light in peripheral areas.
This is different from the other two A12-series Camera units (the other two do not share the LPF or IR cut-off filter. Thus each of the three A12 units has a different image sensor optimized for its own lens(es)).
In addition, to cope with the tight physical constraints, a lens checker is included in the package. You can check by yourself if you can safely mount your lenses.

Let me check with SUPER-ANGULON
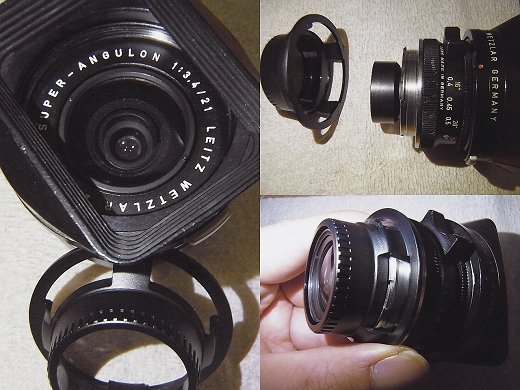
The whole rear of the lens fits in the lens checker so that there is no risk in mounting the lens onto the GXR MOUNT. (Of course, this doesn't mean the lens can be fitted onto other digital cameras with the same mount.)
Old collapsible lenses such as Elmar vary in collapsed length. With the lens checker the owners can find out if they can enjoy the original charm of the collapsible lenses without risk.
The Second Step: In-camera Aberration Corrections
On top of its elaborate mechanical layout design, the GXR MOUNT comes with shading (both luminance and color) and distortion correction functions to help revive a wide range of classic lenses. Since the optimal parameter settings for correcting aberrations vary depending on the lens, specific settings for up to six lenses can be stored on-board each with the respective lens name, and six more settings can be written onto the inserted SD card. (These settings can be easily recalled by MY MODE. Let me explain this procedure in 7) Leverage My Setting function.)
Let me start with how to tackle light fall-off in the corners (Peripheral Illumination Correction).
3) Peripheral Illumination Correction
Choose the Peripheral Illu. from the Shooting Menu.
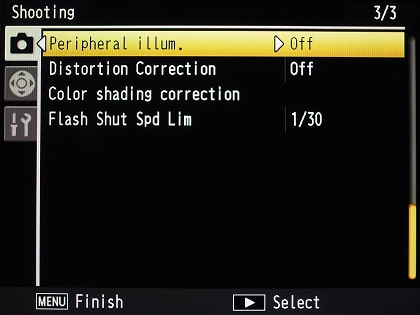
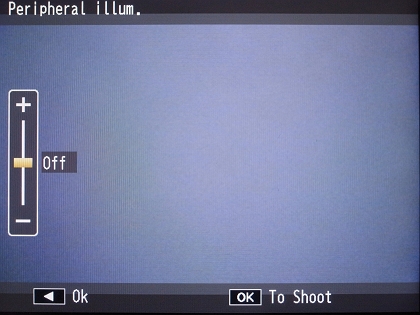
Slide the bar in the direction of "+" to compensate for the lens's light fall-off in the corners.
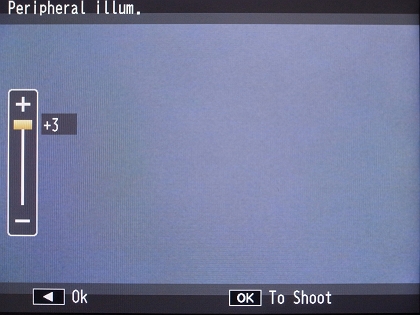
Or slide the bar in the direction of "-" to create light fall-off.

* If you are unhappy with the corner brightness of your favorite super-wide-angle, you can purposely create some light fall-off. (This stimulates my creativity.)
The next menu is Distortion Correction.
4) Distortion Correction
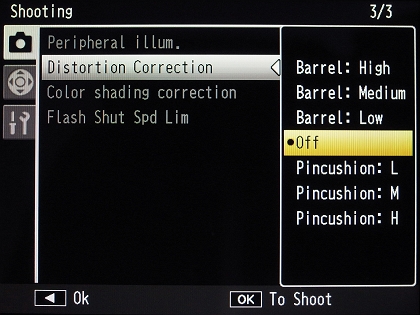
Either barrel or pincushion distortions can be corrected in increments of High, Medium, and Low.
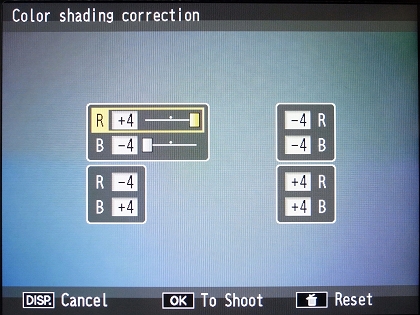
5) Color Shading Correction
Some mirror-less cameras using classic lenses via an adapter may exhibit color cast (or color shading) in the corners of the frame.
This function corrects color shading in each corner independently.
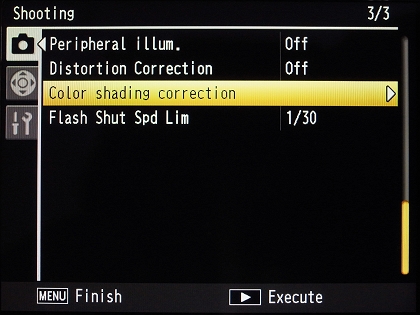
As you can see, minute adjustments for Red and/or Blue channels can be applied in increments of nine levels respectively.
For demonstration purposes, I set different values to each corner in the following figure:
The Third Step: MF Camera Usability - a Ricoh Heritage<
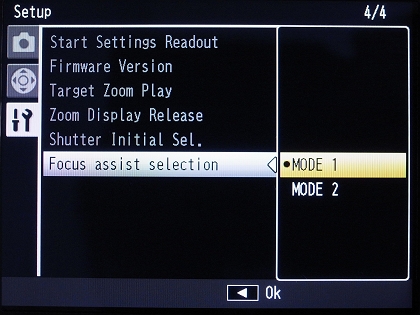
6) Focus Assist and Magnified View
As a full-time manual-focus camera, the GXR Mount offers two mechanisms to make focusing easy and accurate at the same time:
First, the "Focus Assist" function highlights the edges in focus over the live view on the LCD screen or the optional EVF.
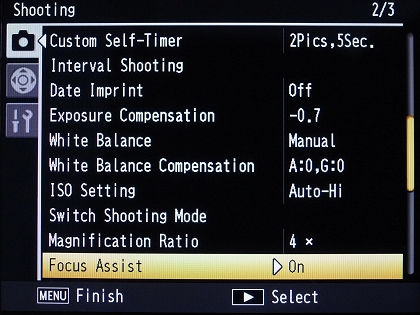
With this function, you can select the background from color or grey depending on your preference or needs.
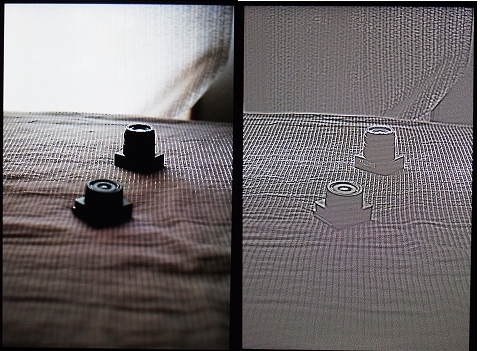
How do they actually look? The following shows a side-by-side comparison of Focus Assist Mode 1 (color background) and Mode 2 (grey background). Of the two camera units in the picture, the one in the back is in focus. You can tell the focus by the highlighted edges in Mode 1, or highlighted regions in Mode 2.
The following shows how they look when I zeroed in on the camera unit in the front.
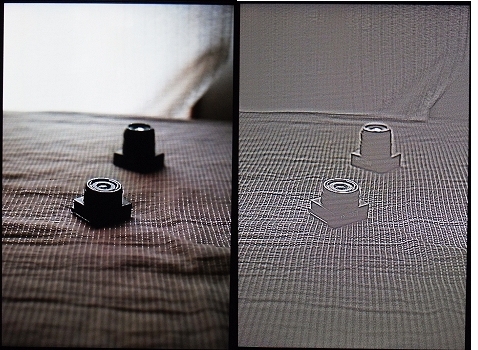
As you can see, while Mode 1 gives a more natural look to users, Mode 2 is more committed to quickly obtaining the peak of the focus.
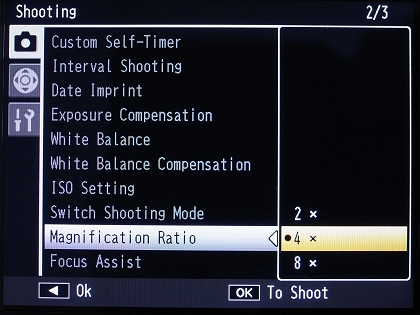
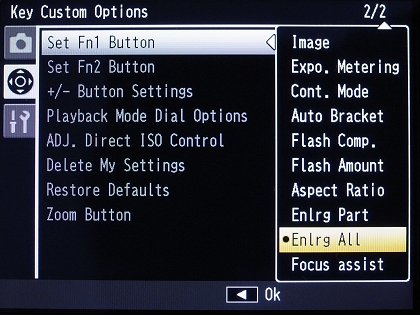
The second mechanism to aid accurate focusing is the Image Magnification function, either full screen (Enlrg All) or Picture-in-Picture (PiP), where a smaller inset window displays the magnified image (Enlarged Part).
By default, the live view image can be magnified by holding the OK button for a full second, and the function can be assigned to one of the Fn buttons as well.
The Magnification Ratio menu gives users a choice of 2, 4 or 8x magnification.
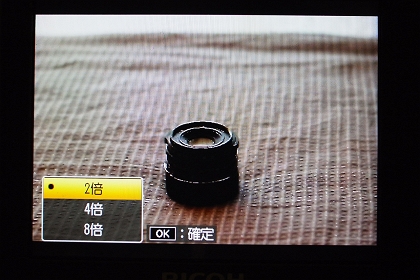
2x Full Screen (Enlrg All)
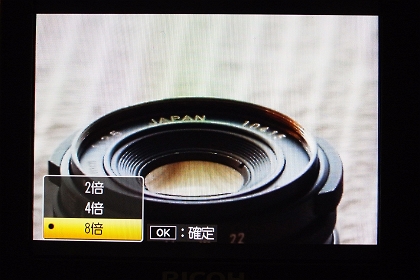
8x Full Screen (Enlrg All)
2x PiP (Enlrg Part)
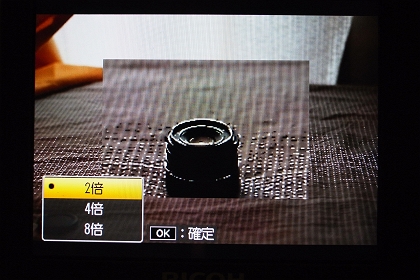
The good news is that the magnified view can be scrolled around the frame using the directional pad (the whole image scrolls with Enlrg All, while the inset window moves with Enlrg Part), in the same manner as moving the AF target with other GXR A12 camera units. In addition, Enlrg All can be used in combination with the Focus Assist function.
Meanwhile, there is a shortcut to change the magnification ratio. Just press and hold the Self-timer button while the image is magnified.
These functions can be assigned to Fn1 and Fn2 buttons as in the following figure:
To make my point clear, let me emphasize that Focus Assist (Mode 1 and 2) and Enlrg All functions are carefully designed to blend naturally into the process of shooting real world photography.
e.g. When Enlrg All is assigned to one of the Fn buttons, you can quickly magnify the view with your thumb and focus with your left hand. Then, half-pressing the shutter button tentatively cancels the magnified view, letting you recompose the frame and shoot. If you release your index finger at this point, you can again obtain the magnified view for refocusing.
In short, you can easily switch from magnified view (and/or FA Mode 1 or 2) to the full composition or vise versa just by a tiny movement of the tip of your index finger, while eliminating the need to re-hold the camera body.
Also, when you move the target in Enlrg All, the camera memorizes the coordinates of the target in case you lift your finger after half-pressing the shutter. This is highly usable in shooting portrait and landscape alike.
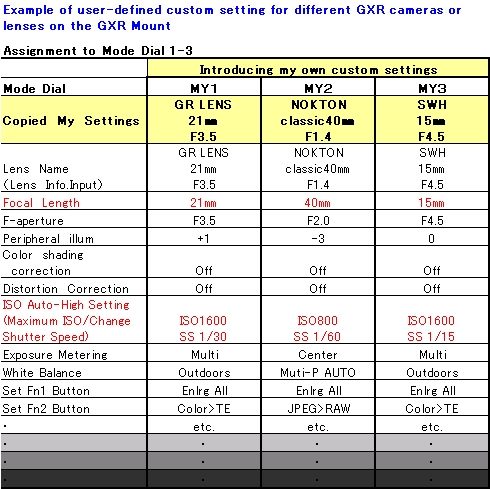
7) Leverage the MY Setting Function
We were genuinely impressed by the user interface. In three MY Settings on the Mode Dial, your favorable setting for each lens can be stored. When you change the lens, by a twist of the dial you can retrieve the set of optimum parameters for each lens and your shooting style.
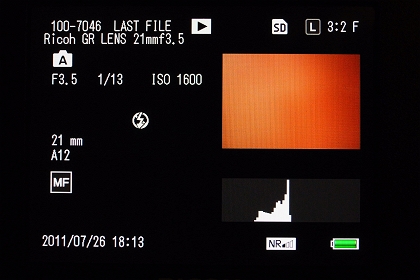
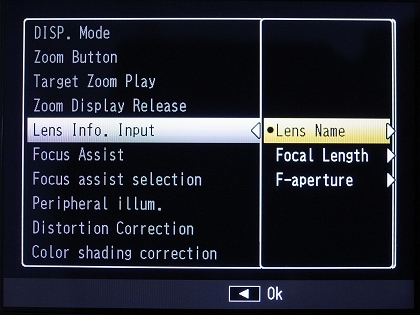
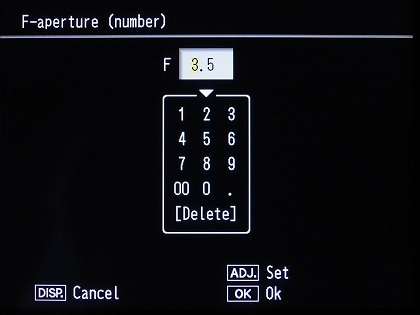
In MY Setting, you may register lens information such as Lens Name, Focal Length and F-Aperture Value, which are to be recorded in Exif information.
The screen shot below shows the playback with the lens information.
Let's see how to edit MY Setting Information
Give a MY Setting Name for easy identification
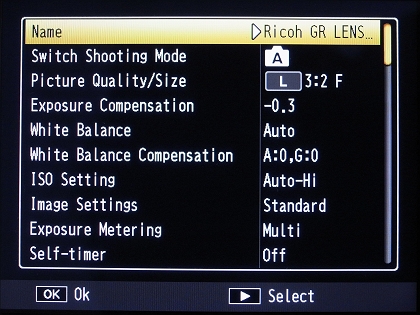
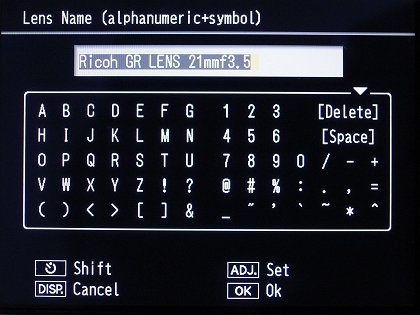
Register Lens Name, Focal Length and F-Aperture Value to be indicated in playback and Exif.
Let's put the Lens Name "GR LENS 21..."
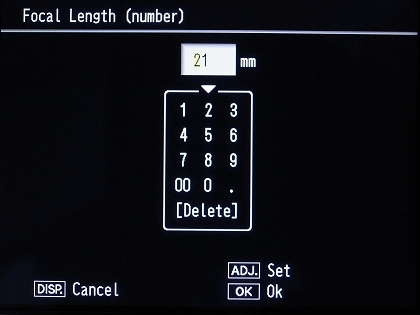
Input the Focal Length
Input the F-Aperture Value
By the way, there is one subtle but significant improvement with this unit: ISO Speed can be set in 1/3 EV steps.
You may set ISO Speed more accurately, balancing the tolerable shutter speed against image blur and image quality in relation to high-ISO speed.
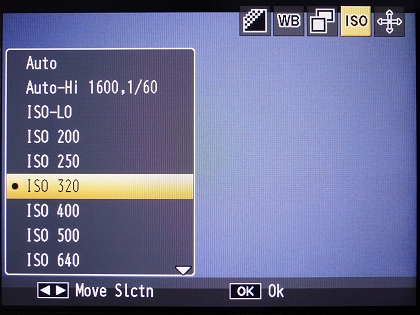
The user interface for ISO speed control in MY Setting is very sensible, too.
8) Improve ISO Speed Setting Operability
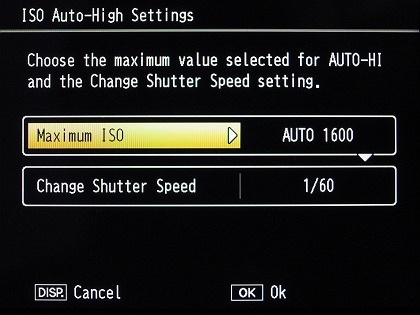
In each MY Setting, you can preset ISO Speed, and as for ISO Auto-Hi, you may preset the maximum ISO Speed and the threshold shutter speed for ISO Speed switch.
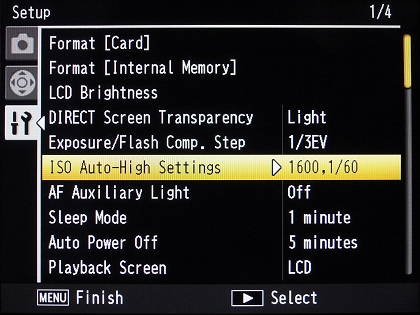
As a result, the GXR MOUNT automatically selects the optimum combination of ISO Speed and shutter speed for the focal length of each lens taking the user's handholding ability into consideration.
In MY Setting for a 40㎜ (35mm equivalent = 60㎜)lens, I preset ISO Auto-Hi with Max. ISO Speed 1600, and threshold shutter speed 1/60 Sec.
As for MY Setting for 75㎜(35mm equivalent = 113㎜) lens, I preset 1/125 sec. as the threshold shutter speed to fit the focal length.
Or you may choose preset values in accordance with the circumstance. For candid street photos, for example, I preset fast threshold shutter speed against subject motion blur (not camera shake).
9) MY Setting Presets Stored in Flash Memory Card
This feature realized our long-time request since the time of GR Digital 3 preproduction verification activity.
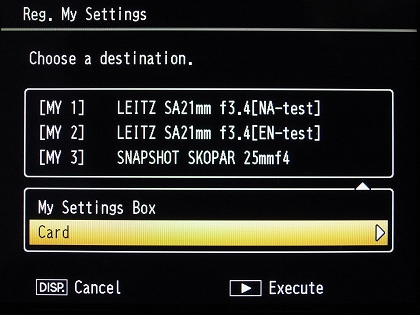
This function allows you to export the shooting parameters. It provides assurance by storing and retrieving a number of customized parameter settings for a variety of lenses. In addition, it opens up the possibility of sharing other person's "best-practice". Anybody can simulate my "special" setting for GR Lens 21mm including Image Setting, Color Adjustment, and White Balance.
Now, let me show you the setting in my case.
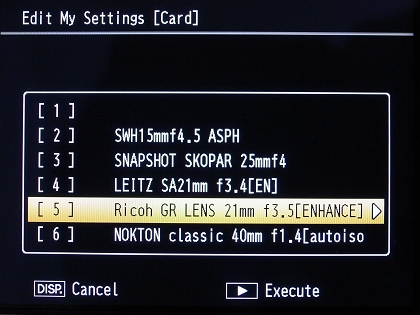
My Own MY Settings
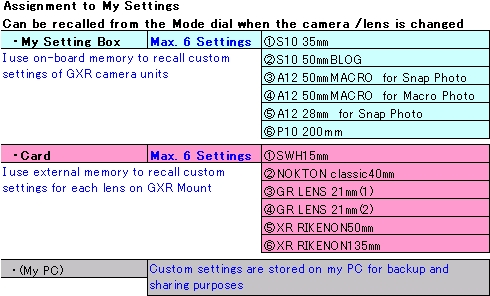
I assigned three MY Settings on Mode Dial to fit three lenses.
When I go with a lens other than those three, I just recall its setting from the SD card. You can save six custom settings in-camera and another six onto the SD card.
Settings saved on the SD card may be shared with your friends, or copied onto your PC as a backup.
One of the virtues of the GXR Mount is that users may personalize it freely, by changing the versatile parameters. This requires a bit of effort, but once you have done it, it is very easy to recall the set of parameters optimized for each lens.
The freedom to customize is applicable to Key Assignment, too.
My case is as below:
The direct operability satisfies even long-time film camera users such as the camera-enthusiasts among Ricoh "in-house testers".
You may adjust settings such as ISO Speed and Exposure Compensation with minimal key touches. Parameter changes can be done without leaving one's eye from the EVF freeing you to concentrate on focusing and composition.
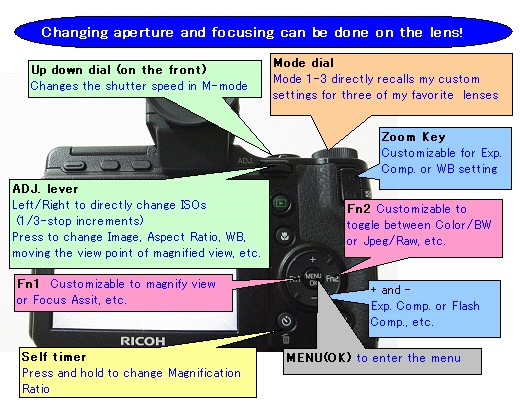
ISO Speed: Direct switch with ADJ Lever
Exposure Compensation: Zoom Lever up and down
Image MagnificationFn1 *You may assign Focus Assist (peeking) on Fn1 and/or Fn2
Color/BW Switch (or JPG/RAW Switch)Fn2
*The example above shows personalized key assignments for myself.
A lot more options are available to be assigned to Fn1, Fn2 and Zoom Lever
Not to mention that pressing the ADJ Lever provides easy access to settings such as White Balance Control, Image Setting, Aspect Ration Setting, as before.
One cannot think of any other digital camera that can accommodate RF lenses with this level of flexibility in photo-shooting.
Experienced photographers like to control shooting parameters by assessing the shooting environment and reading the movements of the subject to catch the decisive moment. Ideally, the operation has to be done almost unconsciously.
Film-to-digital conversion has provided extra freedom of parameter setting such as flexible ISO speed adjustment. The failure ratio could be significantly reduced as a result.
The GXR Mount maximizes this benefit with its matchless operability.
Now, in retrospect, I was concerned about the shutter-release noise. When I received the test unit, however, I was impressed that this model is a different species from ordinary electric viewfinder interchangeable-lens cameras. The mechanical noise, especially, high-frequency noise is well suppressed. I realized that the slide-in unit structure contributes to the low noise since the small compartment packed with components has a minimal space for resonance. One of our engineers also mentioned that the material, magnesium has the characteristic of damping vibration and sound.
There was another concern: the possibility of dust on the image sensor during lens changes.
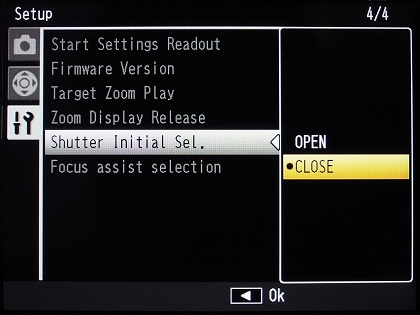
You can select, in the Setup mode, the shutter status at power-off: you may select "CLOSE" as initial setting to minimize dust on the image sensor, and when you need to clean it you can select "OPEN"
In summary, Ricoh has made tireless efforts to enhance usability, and the accumulation of subtle but significant improvements make the GXR MOUNT a camera with a unique touch and feel and unparalleled operability.
Conclusion:
The GXR MOUNT Unit gives new life to classic RF lens assets left unused inside cabinets. Or it may fulfill the role of versatile backup body sharing lenses of your main SLR and/or RF cameras.
In conclusion, when I picked up the GXR MOUNT the other day, for a minute it felt like I was holding my classic film rangefinder, one of my favorite analog cameras. For a while there I really thought the GXR was a film camera, I forgot all about digital. Simply put: the GXR MOUNT is "The best of both worlds".
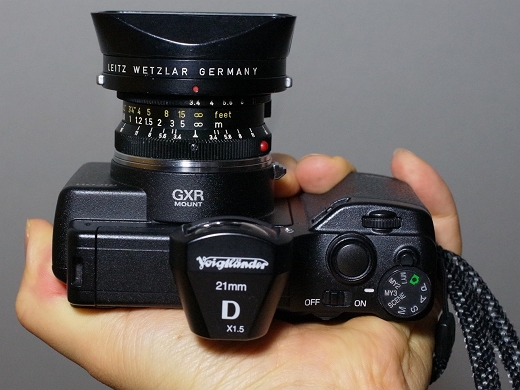
My configuration with SUPER-ANGULON 21mm
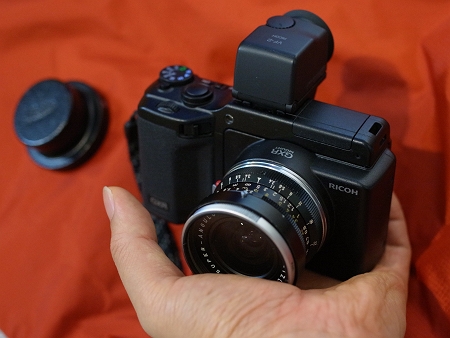
Searching among all the stuff in my house, I came across this finder. This "21mm" finder with x1.5 cropping factor can be used with SUPER-ANGULON on GXR. This combination seems to be ideal for street photography considering the depth of field of this lens.
Finally let me show you a few sample shots.
LEITZ WETZLAR SUPER-ANGULON 1:3.4/21
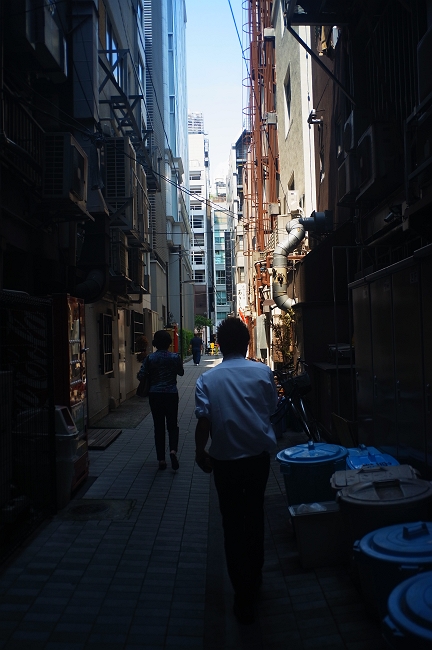


I took these sample photos with a SUPER-ANGULON, without digital compensation on Vignetting, Distortion, or Color Shading thus showing the straight optical characteristics of the GXR MOUNT Unit.
Thank you very much for reading through this long report.
In my next post I would like to show you sample photos taken with a wide variety of lenses. Till then, good-bye!
GXR MOUNT UNIT 2nd Shot (More Lenses)
https://www.grblog.jp/2011/08/gxr-mount-unit-2nd-photo-samplemore-lenses.php
Profiles:
[Kyo-chan]
An in-house tester/reviewer of preproduction Ricoh digital cameras and one of the original members of the GR Blog. Since the GR Blog's inception, Kyo-chan has issued over 70 blog articles (mostly in Japanese).
[Silver]
Another in-house tester of preproduction Ricoh digital cameras. His repertoire includes DSLRs, high-end compacts and point-and-shoot cameras, and last but not least, classic RFs. The GXR Mount unit is really a blessing for Silver. (His handle is named after an RF accessory. Can you guess what it is?) For years, he has worked hard as an organizer for Ricoh Women's British Open golf tournament.
[TRK]
Also an in-house tester of preproduction Ricoh digital cameras and a part-time GR Blog writer. With his inclination toward DSLRs, he highly recommends the GXR A12 50mm Macro, A12 28mm, and GXR Mount units. He is the father of two bilingual kids.
[Furachan]
French-American Ricoh man and recent addition to the in-house testers, he is an avid streetshooter, Henri Cartier-Bresson fan and passionate about SE Asia and India. He has one trilingual Japanese bobtail cat.
*In addition to GR Blog Writers, Ricoh boasts a group of "in-house testers", from outside Camera Business Unit (some like Kyo-chan are co-assigned as GR Blog Writers) who volunteer preproduction verification on prototype units. They submit their findings and proposals with active discussion on a bulletin board DB.
この記事へのトラックバック一覧
- 3Dが似合う [from Kicub Keane Photography]
GXR + Mount A12 + SWH 貞子をみて、ダッシュした自分はかなりの庶民派。... 続きを読む
TrackBack 2012/05/30
- ワークショップ1週間 [from おれのほそ道]
リコーフォトワークショップツアー2011 新潟からあっという間に1週間。当日も雨が心配されながらなんとか持ったのだけれど、今日は本格的な雨。 夕方仕事が... 続きを読む
TrackBack 2011/09/20
- 三宮少々(MOUNT A12試写:その13) [from temporary photographs]
GXR MOUNT A12 FA77mm F1.8 Limited location:三宮/神戸 CS5にて現像 続きを読む
TrackBack 2011/09/12
- 丸の内少々(MOUNT A12試写:その12) [from temporary photographs]
GXR MOUNT A12 FA31mm F1.8AL Limited location:丸の内/東京 CS5にて現像 続きを読む
TrackBack 2011/09/11
- 元町少々続き(MOUNT A12試写:その11) [from temporary photographs]
GXR MOUNT A12 FA77mm F1.8 Limited location:元町/神戸 jpegにて 続きを読む
TrackBack 2011/09/10
- 本日のネコ [from Whisper or monologue]
GXR P10 28-300mm GXR A12 28mm 店番? 家の玄関とか店の入り口になぜかネコは定着するようですな... ... 続きを読む
TrackBack 2011/09/09
- 元町少々(MOUNT A12試写:その10) [from temporary photographs]
GXR MOUNT A12 FA77mm F1.8 Limited location:元町/神戸 jpegにて 続きを読む
TrackBack 2011/09/09
- 神田少々(MOUNT A12試写:その9) [from temporary photographs]
GXR MOUNT A12 FA31mm F1.8AL Limited location:神田/東京 CS5にて現像 続きを読む
TrackBack 2011/09/08
- 建造物の表情 [from 猫と6ペンス]
RICOH GR DIGITAL III (Jpeg/Silver Efex Pro) 大阪あちこち こちらもよろしく モノ... 続きを読む
TrackBack 2011/09/06
- cat #00045 [from モノクロームな猫たち]
ある日の岡山市内 GR DIGITAL2 続きを読む
TrackBack 2011/09/06
- 新カタログ リコー GXR MOUNT A12 [from ★miyack.blog …写真・撮影機材がメインです。]
リコーさんから GXRの新しいカタログが送られてきました。 左が旧タイプ、右が新カタログです。 GXR MOUNT A12の発売に合わせて新しく改... 続きを読む
TrackBack 2011/09/06
- cat #00043 [from モノクロームな猫たち]
ある日の岡山城近く GR DIGITAL2 続きを読む
TrackBack 2011/09/05
- 土曜日の街灯 [from 今日も明日も愛してる]
霧雨が降ったりあがったり。街灯はまだ点かない時間。高いところから見るといつもと違う。この日はなぜか普段買わないような物を買ってしまった。 ... 続きを読む
TrackBack 2011/09/05
- cat #00042 [from モノクロームな猫たち]
ある日の後楽園外苑 GR DIGITAL2 続きを読む
TrackBack 2011/09/05
- おつかれちゃーん [from 猫と6ペンス]
RICOH GR DIGITAL III (Jpeg/Silver Efex Pro) わかるわかるって。 確か堂島辺り 続きを読む
TrackBack 2011/09/05
- 色即是空1 [from 今日も明日も愛してる]
私の友人K氏の写真のテーマは色即是空だった。あのピーンとした色と乾いた空気はもう見られない。 RICOH CX5で撮影 続きを読む
TrackBack 2011/09/05
- GXR MOUNT A12レビュー動画 [from visionary moment ...]
RICOH GXR+A12 28mm 今日のお昼は神戸の郊外にあるカレー屋さんに行ったのですが、店のマスコットであるミニチュアホースの「あずきちゃん」以外... 続きを読む
TrackBack 2011/09/05
- 見晴らしの塔その2 [from GRDⅢな日々]
神戸六甲 見晴らしの塔 GXR A12 50mm プログラム F10 1/1000 露出補正:-1.3 WB:MPA ISO:200 台風一過となるの... 続きを読む
TrackBack 2011/09/05
- 渚にて [from 必撮!勤め人]
★2011年7月12日撮影、池間島、GXR+VF-2+50mm、モノクロ化 視神経が飽和してしまう様な気がするので、時々はモノクロ化したimageを... 続きを読む
TrackBack 2011/09/05
- cat #00041 [from モノクロームな猫たち]
ある日の後楽園外苑 GR DIGITAL2 続きを読む
TrackBack 2011/09/04
- 今週 [from gr-digital.netブログ]
今週は楽しみなことがいくつかあります、ご存知のように金曜日にはMマウントユニットが発売になり、土曜日はリコーのワークショップが新潟で開催されるので参加し... 続きを読む
TrackBack 2011/09/04
- 夏の終わりの曲り角 [from 今日も明日も愛してる]
自販機があり重そうな向日葵があり。暑いけど陽射しも天気もいいかげん。何か飲みますか?この後、外国の人に道を聞かれた。若いカップルだった。 ... 続きを読む
TrackBack 2011/09/04
- 毛馬の閘門で夕涼み☆ [from 青空アート☆柿本大治司法書士行政書士事務所☆大阪市都島区]
撮影 RICOH GR DISITALⅡ 近所の毛馬閘門で、夕涼み。 空を見ながら、ビールを... 続きを読む
TrackBack 2011/09/04
- ペンタックスQを触って来ました:GXRのQマウントユニットは出るのか [from arpのブーブーの館]
先日、まだ発売して間もないときに、ペンタックスQを触ってきました。 実際に見た印 続きを読む
TrackBack 2011/09/04
- 風の町 [from おれのほそ道]
台風12号の影響で連日フェーン現象、今日も30℃オーバー!。 気がつけば稲穂は黄色く実り、コウベを下げている。 台風の影響でいつもより風は吹いているの... 続きを読む
TrackBack 2011/09/04
- 難波浮遊 [from 猫と6ペンス]
RICOH GR DIGITAL III (Jpeg/Color Efex Pro3.0) なんばパークスで浮遊 続きを読む
TrackBack 2011/09/04
- cat #00040 [from モノクロームな猫たち]
ある日の後楽園外苑 GR DIGITAL2 続きを読む
TrackBack 2011/09/04
- 見晴らしの塔 [from GRDⅢな日々]
神戸六甲 見晴らしの塔 GXR A12 50mm プログラム F10 1/1000 露出補正:-1.3 WB:MPA ISO:200 8月の下旬に六甲... 続きを読む
TrackBack 2011/09/04
- 和風流線形 - GR DIGITAL III - [from Piece Of My Life]
Aモード, F1.9, 1/380秒, ISO 64, EV-0.3, WB マニュアル, 画像設定:彩度+1 コントラスト+1 前回記事に続いて大... 続きを読む
TrackBack 2011/09/04
- Zwinger [from What Would Jesus Do ?]
この夏に行ったところ RICOH GR DIGITAL 3 ドイツ ツヴィンガー宮殿 RICOH GR DIGITAL 3 でも、実はそこまで行っ... 続きを読む
TrackBack 2011/09/04
- 土曜の夜はパラダイス [from jutoraの観天望気]
GXR P10 土曜日が休みの前日だったのは、遠い昔。いつしか週休二日で花金とか花木とか言われて久し 続きを読む
TrackBack 2011/09/04
- 9月 [from gr-digital.netブログ]
9月に入ってデジカメの新製品が目白押しの様相です。 ついにニコンの1インチも発表なんて噂ですが、出てくるんでしょうかね? 続きを読む
TrackBack 2011/09/03
- cat #00039 [from モノクロームな猫たち]
ある日の後楽園外苑 GR DIGITAL2 続きを読む
TrackBack 2011/09/03
- 機窓から 2011/08/31 GXR A12 28mm [from An edge of the universe]
関空と大阪 関連記事リコー、特設サイト「GXR MOUNT GALLERY」を公開飛行機 2011/07/09 GXR A12 50mm機窓から ... 続きを読む
TrackBack 2011/09/03
- cat #00038 [from モノクロームな猫たち]
ある日の後楽園外苑 GR DIGITAL2 続きを読む
TrackBack 2011/09/03
- 侵食の痕跡 [from 猫と6ペンス]
RICOH GR DIGITAL III (Jpeg/Silver Efex Pro) 中之島ぶらぶらぶらぶら 続きを読む
TrackBack 2011/09/03
- Tokyo 11.09.03 [from 散歩写真]
やっぱり海が見たくなり、朝、お台場まで行ってみた見たい海はそこにはなかった。。。 ただゆりかもめから、ゆっくり眺めた景色は新鮮に見えた by GR... 続きを読む
TrackBack 2011/09/03
- cat #00037 [from モノクロームな猫たち]
ある日の市民の森 GR DIGITAL3 続きを読む
TrackBack 2011/09/03
- 現実 [from 今日も明日も愛してる]
私は弱虫だからこういう変なものはコワイ。でも、なんだか美しいかも、とどこかで思っている。こんな私に勇気を。 RICOH CX5で撮影 続きを読む
TrackBack 2011/09/03
- おいしいぞ 白くま [from What Would Jesus Do ?]
九州を中心に「白くま」とは “練乳をかけたかき氷” を指すそうです それが、関東でも食べられる… RICOH GR DIGITAL 3 どちらも セブ... 続きを読む
TrackBack 2011/09/03
- 成田空港第2ターミナル その3 [from What Would Jesus Do ?]
British Airways Boeing 777-300 777-336/ER Vietnam Airlines Boeing 777-200 777... 続きを読む
TrackBack 2011/09/03
- フォーカスアシスト [from gr-digital.netブログ]
天気がよかったのでファームアップで追加されたGXRのフォーカスアシストを屋外で試しました。 屋外だと液晶モニターは見にくいわけで、フォーカスアシストがち... 続きを読む
TrackBack 2011/09/02
- 成田空港第2ターミナル その2 [from What Would Jesus Do ?]
QANTAS Boeing 747-400 747-438 RICOH GXR + RICOH LENS P10 28-300mm F3.5-5.6 V... 続きを読む
TrackBack 2011/09/02
- cat #00036 [from モノクロームな猫たち]
ある日の鞆の浦 GR DIGITAL3 続きを読む
TrackBack 2011/09/02